Tuesday, July 22, 2014

Adam Wainwright was featured on the “700 Club”

Last week while in Louisiana I was sitting in the hotel room and was blown away by what I heard…
Adam Wainwright was featured on the “700 Club”
He was discussing how he learned to pitch while recovering from Tommy John surgery. 
Before the surgery  he admitted that he didn’t really understand the finer nuances of keeping hitters off balance. 
But like any of us, he understood that hitting was all about timing and found some very unique ways to his increase his odds for winning each and every at-bat. 
Let me ask you a question before we go any further, let me ask you a question...
  • When you think of timing, you're probaly thinking changing speeds on pitches, right? 
  • How many times do you associate changing speeds with the actual tempo of your delivery?  
You see this a lot with the Far East pitchers, but its never discussed here in America. 
But, guess who does admitted to changing speeds on his actaul delivery? 
Adam Wainwright. 
He also discussed how he also moves from one side of the rubber to the other during at-bats and how this affects the hitter. 
So, just imagine a pitcher with stuff as filthy as Wainwright’s and then add the deception that comes with….
  • Changing angles by moving from side-side on the rubber...
  • Changing speeds on his delivery...
  • And last but not least, changing speeds on the curve-ball, fastball and every other pitch in his arsenal...
To be able to do this, requires some serious FEEL!
To say this mindset goes against what we teach is treading lightly…
Because we’re too focused on…
  • Repeating the same delivery, even though science proves that’s impossible. 
  • Arguing over  “proper mechanics” even though nobody can give a definitive answer to what “proper mechanics” really are. 
  • Hoping to finally find the recipe for the highly sought after “one-size fits all” delivery. 
It's silly really, because sometimes we forget the #1 goal for every pitcher is simple…
Get hitters out! 
But I know what you’re thinking…
  • He’s Adam Wainwright, he throws 95 mph, and …
  • If he didn’t throw in the 90’s he wouldn’t be there! 
True, very true…
Velocity gets your foot in the door and it keeps you there longer
But you know what? 
You can train velocity and FEEL simultaneously. 
In fact, we do it everyday! 
But before you can hope to create more FEEL, you must understand the concept of FEEL.
  • Feel is actually heightened awareness. 
  • It doesn’t necessarily just apply to kinesthetic awareness…
  • It’s actually spoon-feeding the central nervous system what it so desperately craves! 
  • This is why I will preach until I die that mechanics have nothing to do with your ability to throw strikes, nothing!
In my opinion, FEEL is being able to connect the senses to one single goal.  
It’s being able to connect the goal to what you see, hear and feel! 
And the best part is….
Feedback is always available. 
But you’ve got to be looking for it! 
To make a long story short…
  • Feel doesn’t just happen….
  • You’re not just born with feel….
“Training for feel” has to be a part of your daily program….
  • It starts with your warm-up…
  • Carries over to your throwing program and bullpens…
  • And finally, the game mound. 
Because at the end of the day….
Your results on the mound are a direct reflection of what you’re doing off the mound! 
That’s why everything we do inside our program centers around one very important concept…
FEEL!
That's why no two days are ever the same for us...
  • Our warm-up changes each and every day…
  • Our throwing program has flexibility and is totally different for every pitcher, every day! 
  • Our bullpen structures change daily…
The motto for our program is simple…
Today’s plan is based on yesterday’s results! 
The best part is…
  • It’s extremely simple and teaches you how to self evaluate, assess and coach yourself!
  • It’s advanced enough for my MLB Pitchers…
  • And simple enough for a 10-year old pitcher or novice parent to easily apply!
So, if you’re interested in learning how to FEEL, join us the first week of August! 
In fact, I will reveal every secret I know and as an added bonus- you will be the first to test first-hand the power of the connection strap and the new-age velocity program that doesn’t require weighted balls or long toss! 
If you want a front row seat, you can find it here. 
To your continued development,
Lantz Wheeler

10 things I would never, every say

I would never have said that, so that leads me to today’s post about the 10 things I would never, every say, it just so happens…. These 10 have nothing to do with bowel movements or the size of toilet paper rolls. 
  1. Son, quit trying to throw so hard, you will never forget how to throw hard…just throw strikes!  (To the young players anyway)
  2. Slower equals lower- the slower your delivery, the better! 
  3. Do you see that pitcher’s elbow below his shoulder at foot plant?  That’s the definition of connection, so let’s put the “connection ball” under your arm. 
  4. The reason he throws so hard is because of his stride length!  I want you to focus solely on increasing your stride and watch how much faster you throw! 
  5. Every pitcher is capable of throwing 90!
  6. Stay back and make sure you don’t collapse your leg on this throw, and right when you’re about to throw, reach out and put your nose in the catcher’s mitt!  (I’m sure everyone would interpret this the same way, right?) 
  7.  Video is the only way to teach pitching and if you’re not video”ing” you’re not coaching!  By the way, could you make the check out to C.A.S.H? 
  8. Focus on getting the ball up, like the letter L, with it facing towards 2B. 
  9. The reason this pitcher throws hard is because his back leg is extended and if you can somehow extend your back leg, you will throw hard to! 
  10. I can’t wait to get to the ball park and take a poop, the port-o-potty there is so relaxing. 
I’m sure there’s 100 more I could mention, but I’m headed to the facility. 
By the way, if you want to know what I would say, you can find that info here…
http://pitchingmechanicsmastermindsystem.com
To your continued development,
Lantz Wheeler

Friday, May 2, 2014

How to Own A Free Car

How to Own A Free Car

by  | Mar 1, 2014 |
Want to own a free car?  Keep reading.
When I was 16 I bought my first car: a 2nd generation Mitsubishi Eclipse.  Dad and I drove 400 miles across the continuous cornfield called Iowa to make the deal.  I bought the car in early ’06 and sold it in late 2011 for the same price. I had a free car for 5 years.  If you follow this guide, you can do the same.
This post is about buying a used car.  Buying a new car is crazy:
  1. New cars are too expensive (duh)
  2. They depreciate too quickly
  3. They have recalls and unknown problems
  4. Most new cars look good for the first few years but their styling often doesn’t stand the test of time
  5. That sticky vaseline type crap they put all over the car is super annoying
With that said, here’s your guide to ‘buying’ a free car:
Step 1: The Money
  1. Who will pay for which aspects of owning a car?  Things like the car itself, fuel, maintenance/repairs, insurance, tax, title, and license fees all need to be paid.  My parents gave me $2500 to spend towards a car and I would pay anything above that.  Fuel was on me, repairs were split 50/50, and they paid tax, title, and license.  Pretty generous.
  2. Want to do the repairs yourself?  Convince your parents that if you fix the car, they will cover the costs of parts.  They will likely opt for this because they are proud to see you showing initiative and learning how to do things yourself.  Plus no one has to pay labor.
Step 2: The Car
  1. Choose based largely on appearance.  This sounds a bit shallow but people take better care of pretty things.
  2. Consider reliability, mpg, safety, comfort, and passenger/cargo room.  In this step you should Google over and over again to see what real owners think.  Sites such as Edmunds.com, cars.com, consumerreports.com are very helpful.  My favorite are the unbiased reviews posted on cars.com.  Be sure to check out Edmunds.com’s ‘True Cost to Own’ Calculator as well.  You’ll find sometimes a BMW is actually cheaper to own than a Mitsubishi.
  3. Pick year(s) of the car.
  4. Decide trim of selected car.  Research the different options available from the factory.  This is helpful because you’ll want to snag as many of these options as possible.  $200 extra for factory floor mats may fly when buying a car new but we won’t pay that when buying it used.
  5. Pick a car with helpful owners.  Check out the message boards for the cars you are considering.  I’ve found it reassuring to know that if I have a question about my car, there’s a community to help.
Step 3: The Hunt
  1. Buy the car directly from its owner!  Dealerships markup the price thousands of dollars!  And through a private party transaction you can see the car in its true environment.  Does the current owner take care of himself?  If not, he probably abuses the car as well.
  2. Decide how far you will travel for the right car.  Some people go to Hawaii and all they bring back is a sunburn.  Don’t be afraid to take a road trip to snag the perfect car.
  3. The best sites to search are autotrader.com, cars.com, ebay.com, and trusty ol’ craigslist.com.  Sometimes I would randomly Google “Mitsubishi Eclipse” to see what was out there on message boards, etc. that these sites don’t show.

Step 4: The Purchase
  1. This isn’t like the ‘three days rule’ in dating (not that that’s a great rule either…).  When the car you want comes up for sale, act quickly!  I can’t begin to tell you how many deals have fallen through for me just because I didn’t get to the car quick enough.  Once you find a car you want, connect with the seller ASAP and if there’s a phone number listed, use that instead of text or email.  A buyer will know you’re more serious than someone who texts.  BUT do not act desperate!
  2. Schedule a time to meet.  Tell the seller you are bringing cash so he knows you are serious.  Ask the owner to email you a Carfax.  It’ll run him about $35 but he shouldn’t mind.
  3. Bring cash.  Paper checks are boring.  Cash is hard for a person to decline.  I prefer crisp stacks of $50 bills.  Go to the bank and ask them for new, wrapped bills and they will happily comply.  Bringing cash allows you to peel bills out of the stack before the purchase if the car isn’t quite as described.
  4. Bring a friend/family member.  Bring an older, responsible car guy/girl with you.  This will add security for you and your cash, gives you another pair of eyes to look the car over, and helps you from feeling intimated.
  5. Inspect the car.  Ask for maintenance records!  Look for rust, smoke smell in the interior (often poorly masked by 15 air fresheners dangling from the rear view mirror), smooth sound of the engine, and easy gear shift changes of the transmission.  Make sure to take on a nice long test drive.  Pretend you own the car and make sure it suits you.  If you’re buying a convertible, I strongly recommend taking it through a car wash to see if the top leaks (as many do).  If it does, probably say no to the car and send the owner the car wash bill (just joking… but seriously, you don’t want a leaky, smelly, moldy convertible).
  6. How to deal.  You should know how much the car is worth based on its NADA.com, KBB.com, and market values.  Sometimes if people are selling private party it means they must sell quickly.  Remember you can walk away from a deal at any time.  If you remember this, you can be a lot more confident in the negotiating process.  Also, when someone says they want $10k for a car but you only think it’s worth $8k… forget about the $10k number.  It’s about the price you will pay not the price they are asking.

Step 5: The Satisfaction
  1. Enjoy your freedom and remember to drive that car to your job more often than to the movies!  And take good care of the car and the car will take good care of you!

I hope you’ve enjoy the how-to guide!  Now go buy low and then sell high!

Tuesday, April 29, 2014

5 Absolute Musts For Having An Injury Free Baseball Season – Baseball Injury Prevention Program


Written By: 
|
April 28, 2014
|
Posted In:
**Full Disclosure – I have made product suggestions in this blog post with links to
Amazon. If you purchase any of these items I will receive a few pennies… literally.
I am not trying to trick you or sell you on anything. I am just providing you with insights
into what I did during my career.**
Okay, now that we got that out of the way… Here. We. Go.
====================================================
The first step to having a consistent season is staying injury free, just ask Grady Sizemore.
There are a ton of injuries that happen that are “freak” and largely out of your control, like tearing
your ACL or separating your shoulder. You can work your tail off to be strong in your muscles
around your knees and shoulders, but that doesn’t guarantee you won’t have a freak injury.
Fortunately you can have a massive impact on preventing many injuries that shelf players
for up to 6-8 weeks, like a hamstring pull or oblique strain.
Here are my 5 Absolute Musts for Having an Injury Free Season

1. Eat for performance

One of the biggest cliche’s I heard from nutritionist over and over again is the analogy about filling your car
up with garbage and expecting it to run perfectly.
Your body works the EXACT same way. If you want your body to perform like a well oiled machine then you
have to fill it up with premium gas.
A properly distributed diet is HUGE for long term success because of the length and grind of the baseball
season.
Do you know the exact foods you need to be eating on a daily basis for maximum performance?
How many calories you should consume based on your height/weight?
These are questions you MUST know the answer to especially if you are a player who
struggles to add or maintain weight.
I’ve never had problems gaining lean weight because I know exactly what I need to eat,
when, and how much.
Your diet is just as important as getting in the cage and taking swings. It takes work just
like every other part of baseball.
Here’s a great place to start researching your sports nutrition

2. High Quality Sleep

Every athlete should get at least 8 hours of quality sleep per night. I would recommend getting closer to 10 hours of sleep
per night for maximum recovery.
This is going to mean getting to bed EARLY. If you want to make your dreams a reality then you will have to make sacrifices
along the way.
For you to be able to do this that means you are going to have to manage your time extremely efficiently.
For example, if you know you have a test next week then study every single night for 25-30 minutes so you don’t have to study
for 2-3 hours the night before the test. This was always REALLY hard for me to stay disciplined on but it was a huge habit that
helped me dominate college. Develop it now.
Here are some more tips for getting high quality sleep.
  • Turn Off The EntertainmentTurn off the TV, Video Games, Twitter, Facebook, Instagram, 30-60 minutes before you go to sleep.
  • Develop a pre-bed time routine.
Take a shower, brush your teeth, read a book, etc. Just do the same thing every night
before you go to sleep.
  • Don’t drink caffeine 12 hours before bed time.
Put the NO Explode, C4, or Assault down. You don’t need it. Create your own mental energy
to motivate yourself.
It’s much more powerful to learn how to motivate yourself than to take some magic potion
to get you going.
  • Don’t Text Before Bed.
Especially that special someone. Just tell them you are going to bed 30 minutes before you actually
do.
  • Take a natural sleeping aid to help with recovery
This was one of the biggest things I noticed gave me high quality sleep after
a trainer at Mississippi State suggested it to me. It’s called ZMA and helps you
get a deeper level of REM sleep which is huge for the recovery process.
You can pick some up here. This was made in Twinlab’s NSF Certified for Sport Lab
which means that all the ingredients are verified to be sure there are no PED’s.
Always stay squeaky clean :)

3. Get on the Foam Roller

Here’s a link to a full article that will explain it much better than I ever could. :)
http://breakingmuscle.com/mobility-recovery/what-is-a-foam-roller-how-do-i-use-it-and-why-does-it-hurt
You can pick yours up right here and get started ASAP


4. Use a Stretch Band after every physical activity.

Using an elastic stretch band is a key to getting a great stretch after a workout, game, or practice because
it allows you to place as much pressure as you feel you need and without a partner.
It’s extremely important to make a habit of stretching after you are done working out to maintain flexibility
and prevent injuries from occurring.
There is always a debate about how much stretching really matters from a scientific standpoint. As a player it always
gave me the confidence to go 100% whenever I was as flexible as I possibly could be, especially after I missed 20 games
my sophomore season in college from a hamstring strain.
If you don’t have one, I highly suggest picking yours up right here ===> http://amzn.to/1flbNUK

5. Supplement Your Diet with Protein

http://amzn.to/1hHg5Ey
The best kind of protein you can have is found in regular food (Chicken, eggs, steak, pork, etc) but I’ve always found
it extremely difficult to get enough protein throughout the day through these sources. Especially during school or when
I was on the go it was always easier to have a ziplock bag full of protein, dump it in a shaker, and mix it. You can crush
it between classes pretty quickly.
It fills you up, helps your body recover, and keeps muscle on your body.
Here was the exact kind I used while I was playing at Mississippi State and in the minor leagues.
Pick Up Your Protein Here ==> http://amzn.to/1hHg5Ey

Again, these are suggestions and many more products exist than I have included in this blog post. This is what I found worked
for me the best to stay healthy throughout my career.

Keep Swinging,
Coach Powers

Monday, April 7, 2014

What if?

Today's guest post comes from current Cressey Performance intern, and former D1 college baseball player, James Cerbie. -EC
What if?
It’s the age-old question that has haunted athletes and competitive people for ages.
What if I had done this? What if I had done that? What if I hadn’t been stupid and done ?
Unfortunately, these questions will never have answers. It’s impossible to go back and revisit what could have been. Rather, we’re left to look at the now, learn from our “what if” moments, and share our new understanding with another generation. That is where I now find myself.
I’m in the middle of my internship here at Cressey Performance, and to say I’m greeted with the “what if” question on a daily basis would be an understatement. Everyday I get a glance at how we train and prepare athletes, and get to reflect on how I was trained and prepared.
cerbie
And just to bring you up to speed, I’m speaking to the training and preparation of baseball athletes. I’m currently 24 years old and spent approximately 19 of those years playing baseball. It was my greatest passion growing up and I devoted countless hours to my craft. My hard work eventually paid off as I got to play Division 1 baseball at a great school (go Davidson). But, nevertheless, it’s impossible to wonder what could have been if I had known what I know now.
Here are 6 things I really wish I would have known, or done more of during my baseball career, courtesy of my experience here at Cressey Performance.
1. Get assessed.
I’ve always been a good athlete. That’s not to toot my own horn because I have my parents to thank for that more than anything; it just is what it is.
Because I was always a good athlete, however, I believe certain aspects of my training got overlooked. Number one on that list being an assessment.
Not once, throughout my entire athletic career, did I ever get assessed.
If I got injured or came up short on a certain task it was just chalked up to being an athlete:
“James…these things just happen. You’re a good athlete and getting injured is just a part of what you do.”
Oh really? A stress fracture in my back, multiple hip flexor strains, a pulled quad and a host of other injuries just happen for the sake of happening? Sorry, but that answer always frustrated me. What I really heard was:
“James…you keep getting injured but I really don’t know why.”
Don’t get me wrong, I understand that getting injured is a part of sports. Here’s the difference though: there are fluke injuries that pop up on the rare occasion, and then there’s being “chronically” injured which entails always being nagged by one thing or another.
Throughout my collegiate baseball career, I fell in the “chronically” injured category and would constantly be met with suggestions like:
“Oh, your hamstrings are tight. Just stretch those bad boys a couple times a day and that’ll help.”
“Oh, your hips are tight. Just stretch that and things should start feeling better.”

For those of you who haven’t tried the “stretch it because it’s tight” routine, let me save you the time and effort: it doesn’t work. There’s far more to it than that.

I don’t want to start sounding like a repetitive drumbeat, so let’s get to the point: you need to be assessed. It’s the number one most important thing you can do; it’ll help you stay healthy and take your performance to the next level.
I’ll use myself as example.
The first time I met Eric was about a year after I stopped playing baseball. Having heard great things about him, I visited Cressey Performance for a one-time consultation. Here’s an excerpt from the email Eric sent me, highlighting my “problems.”

“1. Your sit in significant scapular downward rotation, and your humeral head dives forward whenever you extend or externally rotate. These are super common in overhead throwing athletes, and you just took them a step further by also becoming an overhead pressing athlete! You simply don't get enough upward rotation when your arms elevate - and that's a big thing we'll address with these warm-ups.
2. Getting upward rotation and good overhead motion is also heavily dependent on building up anterior core stability. You're extremely lordotic and heavily overuse your lats to not only pull the spine into extension, but also take the scapula into depression/downward rotation. When lats are this overactive, your lower traps don't want to do their job. So, core stability closely relates to shoulder mobility and stability (not to mention breathing patterns and a host of other things). You could also see how your anterior weight bearing negatively affected your squat pattern, and why that counterbalance made so much of a difference.”
He actually talks about some of these issues in this video:
In short, here were my issues:
- I was incredibly extended with an obnoxious amount of anterior pelvic tilt
- I had crazy overactive, short and stiff lats
- Lower trap strength equivalent to that of a 7-year-old girl
- A 6 pack that meant nothing because my core was actually really weak
Cue epiphany.
I finally had answers to my seemingly endless list of injuries throughout college. Almost all of them could be tied back in one way or another to the list above and here’s the frustrating part: nobody had ever looked at these things before or had ever written me an individualized program to address them.
I was merely given generic “athletic” development programs that fed into and compounded my dysfunction.
Moral of the story? Get assessed.
2. Movement comes first.
I always equated problems with strength. I thought strength could solve any deficiencies I had and approached my training likewise. Looking back, I now realize how dumb that was.
More times than not, especially as you get older and advance from level to level, it has far less to do with strength and far more to do with how well you move. Like Gray Cook says, “Don’t layer fitness on top of dysfunction.”
Well, I layered a whole bunch of fitness on top of dysfunction.
This happened because one, I was never assessed, and two, I was incredibly stubborn. The thought of taking a step back to work on movement quality irked me like no other.
“I can squat over 400 lbs. Why am I going to go do goblet squats with an 80 lb dumbbell?”
This was foolish, and something the coaching staff at CP does an excellent job of handling. Because Cressey Performance puts every client through an assessment, they know what a client needs to work on and how to do so properly. Many times, this means taking a small step backward (from the client’s point of view) in order to take an enormous step forward.
CP579609_10151227364655388_1116681132_n
Unfortunately, most athletes are like I was. They want to always push the envelope and the thought of taking a step back is almost insulting.
Dear athletes: Please change this attitude.
I can’t harp on the importance of movement before strength enough. Do what you need to do to make sure you move well before you worry about building up strength. Your body and your career will thank you as you stay healthy and reach the highest levels of performance.
3. Focus on the little things.
It’s often the little things that get overlooked the most. These are things like prone trap raises, breathing patterns, soft tissue work and your posture outside the gym. They aren’t sexy and are, to be quite honest, boring.
It’s these boring and non-sexy items, however, that make a big difference.
Putting your full attention into the tiny details of arm care, how you breathe, how you stand, and how you often you foam roll will make the difference between being good and being exceptional.
Luckily, the athletes at CP have a staff that understands this and harps on it daily.
4. Do more single-leg work.
There were few things I hated doing more than lunges, single leg RDLs, split squats, step-ups…really any single-leg exercises. I hated them because I sucked at them.
Tell me to do something on two legs and I crushed it. Put me on one leg (especially my right) and I turned into Bambi on ice.
Okay, so it wasn’t that bad, but it definitely wasn’t my forte.
Instead of forcing myself to conquer this deficiency, I merely found ways to implement as much bilateral work as possible. Seeing as the vast majority of baseball, and pretty much all sports for that matter, are played on one leg, this wasn’t the smartest decision. I would have been far better off doing like we do at CP and hammering single-leg work.
Not just doing lightweight, high rep sets though, but getting truly strong on one leg:
Ultimately, I believe a lot of the success CP baseball players have is because they are forced to get strong on one leg, while most people take my approach and only get strong on two.
Side note: that’s not to say CP athletes don’t get strong on two legs, because they do.
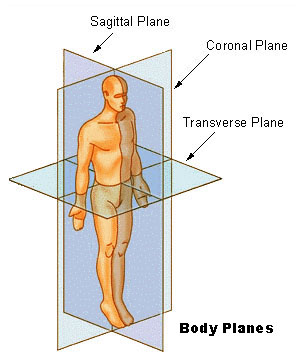
5. Get outside the sagittal plane.
Oh…the beloved sagittal plane.
BodyPlanes

 
Visit most weight rooms and you’ll see people living in the sagittal plane:
Squatting…sagittal plane
Deadlifting…sagittal plane
Box jump…sagittal plane
And the list could easily go on. Most sports (and life for that matter), do not comply with this North-South straight-line orientation; they are lived in multiple planes of motion.
Just think through the complexity and mechanics of throwing a baseball. All the things that need to take place to ensure a ball is thrown at the correct velocity, with the right spin and the right trajectory to bring about the desired result. It’s pretty amazing stuff when you consider the minute details.
Here’s another cool little tidbit of info: power development is plane specific. Just because you can generate power in one plane doesn’t mean you’ll do so well in others.
cish62115_10150356086959953_2125131643_n
Yup…you guessed it. I missed the boat on this one also.
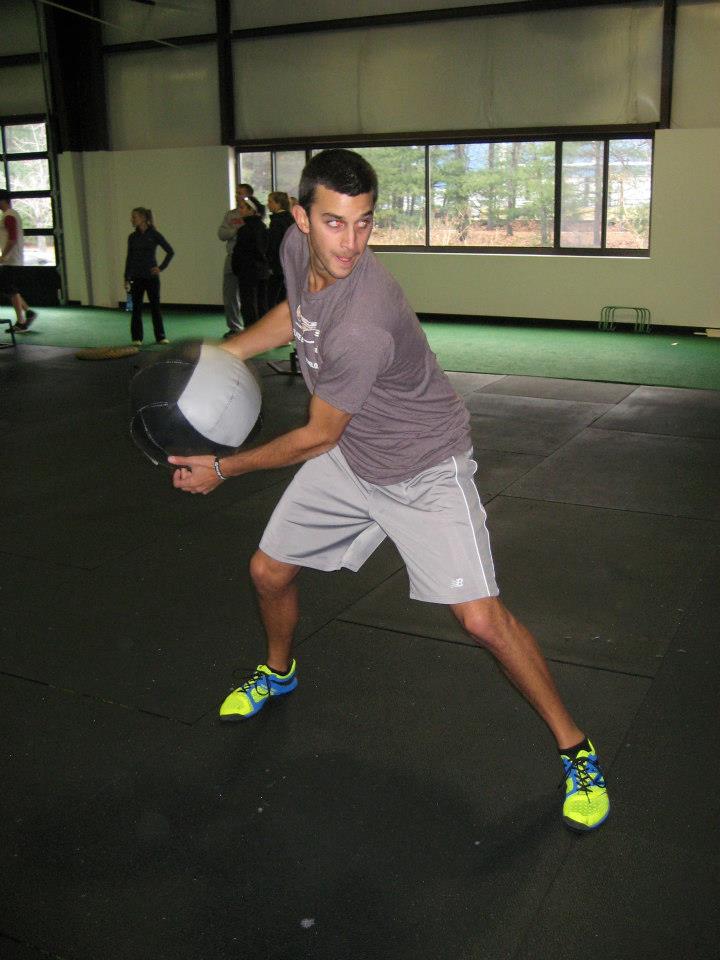
At CP, however, they get outside the sagittal plane, and do so often. First on this list is medicine ball throws.
They use a lot of different medicine ball throwing routines to help their athletes develop power in the transverse and frontal plane. A great example of such an exercise is the rotational med ball scoop toss:
Second, they implement exercises like the 1-arm kettlebell lateral lunge and heiden:

Lastly, they use off-set loading on exercises; this provides a rotational component to the movement because the body has to resist rotating towards one side vs. the other. A good example of such a movement would be a 1-arm 1-leg kettlebell RDL:
Although this barely scratches the surface when it comes to exercises used by Cressey Performance and the importance of training outside the sagittal plane, I hope it has given you a good frame of reference.
6. More doesn’t equal better.
There’s a time to push it and a time to back off. Being an in-season athlete is not one of the “push” times. Many coaches, however, forget this and continue pushing their athletes as if nothing has changed.
If you read Eric’s blog often (which I hope you do) you’ll know he says, “You can’t add something without taking something else away.” I really wish that quote could be plastered on the walls of weight rooms around the country.
When the volume of swings, throws and sprints picks up because you’ve started the season, then you have to start taking something away.
Having been lucky enough to spend the past few months at CP, I’ve gotten to witness this first hand. As pitchers begin entering their competitive season (when they’re obviously throwing more often), you see a change in the program to reflect the increased volume outside the weight room.
Medicine ball throws are scaled back, if not eliminated completely. Lifts move towards a two-day per week full body structure, and extra movement days are limited.
As an athlete, it’s easy to forget how everything you do adds up. Every swing, every throw, every sprint and every lift leaves traces in your nervous system. And, although you may be awesome, your body can only handle so much. I understand the desire to get in and work hard, but you have to remember that a lot of times, less is more.

Closing Thoughts
At the end of the day, this barely scratches the surface when it comes to things I wish I would have done differently. As opposed to dwelling on that, however, I’d rather write and share my experiences with coaches and athletes so they can avoid making the mistakes I did. Feel free to post questions or discuss your own experiences in the comments section below.

About the Author
James Cerbie is a cecerbie1rtified strength and conditioning specialist and USA weightlifting sports performance coach who is Precision Nutrition Level 1 and Crossfit Level 1 certified. He has been blessed to work with athletes from the middle school to professional level, including powerlifters, Olympic lifters and Crossfit athletes. Cerbie gets no greater enjoyment than seeing people improve, succeed and achieve their goals. He’s the owner of Rebel Performance and currently works as a strength and conditioning intern at Cressey Performance. You can follow him on Twitter and Facebook.

Monday, March 3, 2014

Eric Cressey shares some of his favorite exercises for athletes who are at risk for shoulder problems


Exercises for Athletes
Choosing the right exercises for athletes with unique needs can be a daunting task. However, once you crack the code, correcting the underlying issues with your athletes becomes a joy.
With over 80% of the clientele at Cressey Performance consisting of baseball players, we’ve come to appreciate some of the unique demands of overhead throwing athletes. And perhaps no adaptation in these shoulders is more important to consider than the loss of scapular upward rotation.
Research has demonstrated that baseball players (and presumably tennis, swimming, volleyball, and track and field throwing participants) lose upward rotation of the scapula over the course of a competitive season. Very simply, this is a fancy way of saying that the shoulder blades can’t rotate up enough on the rib cage during overhead movement.
This is a big problem, as the scapula is the “socket” in the shoulder girdle’s “ball-and-socket” joint. If the socket is too low and the ball (humeral head) is too high, we can irritate the rotator cuff, biceps tendon, or superior labrum. This problem is exacerbated when the rotator cuff isn’t strong enough to help keep the humeral head down as the arm is elevated and when the lats get really gritty, short, and nasty from overuse. We’ll get to some great exercises for athletes who are at risk in a second, but first, consider how this shoulder instability happens in the first place—and how we should correct it.
We’ve all heard the analogy of the shoulder being unstable like a golf ball sitting on a golf tee. If the golf tee can’t rotate up effectively, then the congruency between the two can’t be maintained, and that’s when shoulder instability develops. With that in mind, we need good exercises for athletes that teach the scapula to get up, and that means driving it with overhead reaching. Here are four of my favorite movements to accomplish this:


You can also work in lateral lunges with overhead reaches, spiderman variations with overhead reaches, and a host of other exercises to help build this upward rotation proficiency. Try out these exercises for athletes who are at risk for shoulder problems, and you’ll notice a huge difference in how your overhead athletes actually perform in overhead positions!

Thursday, February 20, 2014

Mental approach

I just ran across an article about the "mental approach " to hitting.

This was from a guy who is really a pitching guy.

Here's what I just wrote him:


Hey **** this is Steve Englishbey ---------I just ran across an article on hitting you wrote recently.

While ,in general I agree with much of what you are saying [see ,for example what I wrote in 2007 here at Webball http://www.webball.com/cms/page3400.cfm] ,I want to focus on one thing you said :

"This is the irony of why a large percentage of hitters, who work so hard on their hitting in practice, may find it difficult to translate this hard work into a game situation."

Yes, many "work hard."

But most ---and I do mean most----do NOT work in what I consider smart and EFFECTIVE ways.

Why?

Because VERY few hitters/instructors understand the ACTUAL biomechanics/physiology of a good swing.

That being the case they do NOT have a good understanding of cause and effect relationships that help or hinder the development of of REALLY good swing.

And that being the case they[hitters /instructors] do NOT know how to go about creating the kinds of EFFECTIVE practice methods that would actually yield a better swing.

Thus ,most hitters never really improve upon their capability to swing a bat ----in a manner that allows them to continue to compete against the increasingly good pitching they will eventually run into.

Which eventually translates into a condition wherein you can have all the confidence ,mental preparedness,etc., in the world ,but if you have what I consider a poor swing plane [which is most] ,or poor swing quickness [again most ] ,you ARE going to fail at some point .

So,my argument here is pretty straightforward  .

What I'm saying is that most fail to reach their potential ,not because of mental flaws ,so to speak,but due to the fact that neither the player nor instructor really understand "how the body works" in the context of swinging a bat.

My evidence ?

Well, 15 or so years looking at instructors and their instructions ---for example ---I have yet to find A SINGLE dvd or YOU TUBE hitting instruction demo ---wherein I would say along the lines of : "ok ,this guy here really understands the dynamics of a swing in a manner that could really serve a hitter well."

Not a single one.

This includes Epstein ,Yeager, Lau ,etc.,etc. [as well as many others that one may or may not be real familiar with].

 Some are better that others of course --but none really  understand the dynamics of a kinetic chain in the context of swinging a bat.
 
Think about going to a heart surgeon who had SOME knowledge of the body.

Would you want to go to THAT guy?!

This is the current state of hitting instruction ---from little league to MLB.

A collection of guys who know SOME things -----but for the most part they do not really know enough to truly help many hitters.

steve

-------------------

When I get some time,I may add to this.

Or,if the author responds I may put it [and my response ] here .

steve